Developer Guide
Table of Contents
- Acknowledgements
- Setting up, getting started
- Design
- Implementation
- Documentation, logging, testing, configuration, dev-ops
-
Appendix: Requirements
- Product scope
- User stories
-
Use cases
- [ST1] View statistics
- [DE1] View delivery job detail
- [DE2] Add a delivery job
- [DE3] Delete a delivery job
- [DE4] Edit a delivery job
- [DE5] Find a delivery job
- [TT1] Display timetable of scheduling tasks of current week
- [TT2] Display timetable of scheduling tasks of week containing a specific date
- [TT3] Display list of unscheduled/completed jobs
- [RE1] Alert scheduled jobs
- [RE2] Alert reminders
- [RE3] Add reminders
- [RE4] Delete reminders
- [RE5] List reminders
- Non-Functional Requirements
- Glossary
- Appendix: Instructions for manual testing
Acknowledgements
- Libraries: JavaFX, ControlsFX
- Evolved and forked from AddressBook 3
Setting up, getting started
Refer to the guide Setting up and getting started.
Design
.puml files used to create diagrams in this document can be found in the diagrams folder. Refer to the PlantUML Tutorial at se-edu/guides to learn how to create and edit diagrams.
Architecture
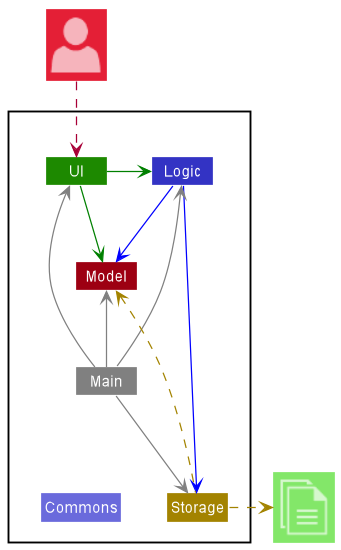
The Architecture Diagram given above explains the high-level design of the App.
Given below is a quick overview of main components and how they interact with each other.
Main components of the architecture
Main has two classes called Main and MainApp. It is responsible for,
- At app launch: Initializes the components in the correct sequence, and connects them up with each other.
- At shut down: Shuts down the components and invokes cleanup methods where necessary.
Commons represents a collection of classes used by multiple other components.
The rest of the App consists of four components.
-
UI: The UI of the App. -
Logic: The command executor. -
Model: Holds the data of the App in memory. -
Storage: Reads data from, and writes data to, the hard disk.
How the architecture components interact with each other
The Sequence Diagram below shows how the components interact with each other for the scenario where the user issues the command delete 1.
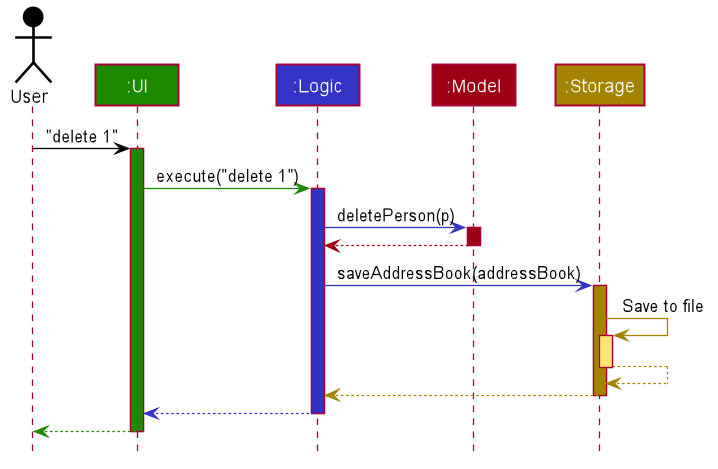
Each of the four main components (also shown in the diagram above),
- defines its API in an
interfacewith the same name as the Component. - implements its functionality using a concrete
{Component Name}Managerclass (which follows the corresponding APIinterfacementioned in the previous point.
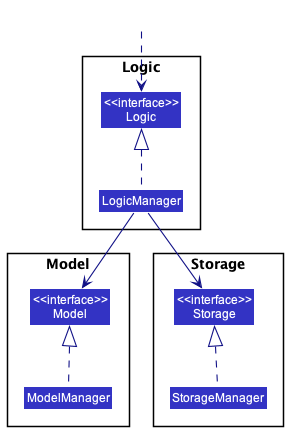
For example, the Logic component defines its API in the Logic.java interface and implements its functionality using the LogicManager.java class which follows the Logic interface. Other components interact with a given component through its interface rather than the concrete class (reason: to prevent outside component’s being coupled to the implementation of a component), as illustrated in the (partial) class diagram below.
The sections below give more details of each component.
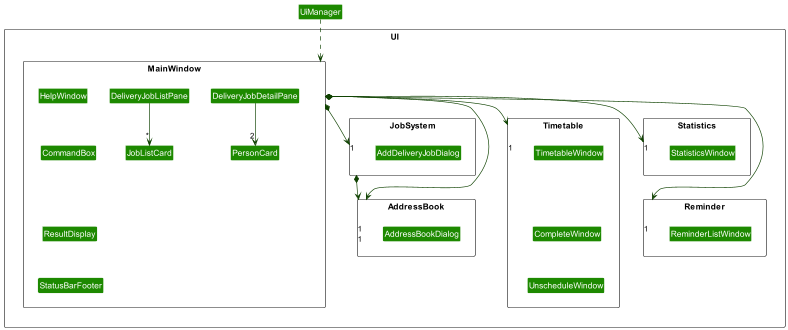
UI component
General
The API of this component is specified in Ui.java
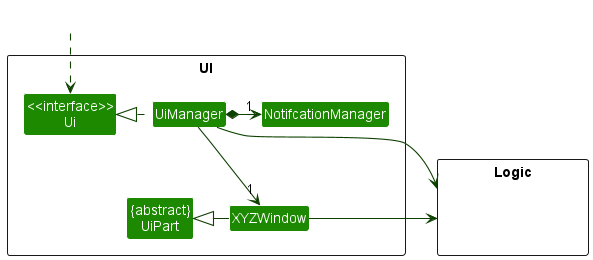
The UI layer consist of multiple windows from different components. All windows inherits the abstract UiPart class which captures the commonalities between classes that represent parts of the visible GUI.
The UI component uses the JavaFx UI framework. The layout of these UI parts are defined in matching .fxml files that are in the src/main/resources/view folder. For example, the layout of the MainWindow is specified in MainWindow.fxml
The UI component,
- executes user commands using the
Logiccomponent. - listens for changes to
Modeldata so that the UI can be updated with the modified data (usingaddEventListener). - calls predefined event handlers when an action,
button,mouseorkeyboardetc, is performed by the user. - some window keeps a reference to the
Logiccomponent, because theUIrelies on theLogicto execute commands. - depends on some classes in the
Modelcomponent, as it displaysDeliveryJoborPersonobject residing in theModel. - Although not represented in the diagram, the UI component starts the Notification function as soon as the app runs.
Main Window
On start, the UIManager will display the MainWindow that is made up of parts e.g.CommandBox, ResultDisplay, DeliveryJobListPanel, StatusBarFooter etc. The MainWindow serve as a main interaction and entry point to other windows for users.
Timetable Window
Timetable Window displays timetable of the specific week - which is specified by user. The “main” timetable window only contains scheduled jobs (jobs that are scheduled and not yet completed). However, we also have separated windows for completed and unscheduled jobs (UnscheduleWindow and CompleteWindow). Timetable Window helps users to stay organized and structure their plans for the week.
-
Timetable Window:
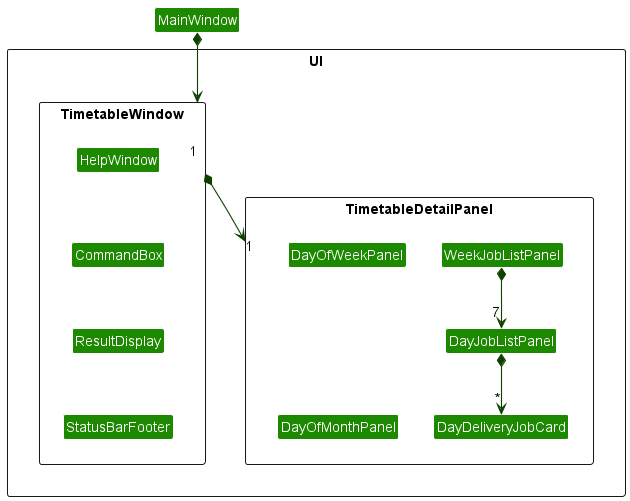
- displays the corresponding job list with the correct date and slot
- returns command execution result.
- remains up-to-date with the job list by using
ObservableList<DeliveryJob>#addListener()onLogic#getFilteredDeliveryJobList()- which will listen to changes made to the delivery job list. -
TimetableWindowgets the sorted job list by date and slot usingLogiccomponent and fills in the timetable.
Upon calling MainWindow#handleTimetable(), the diagram below shows how TimetableWindow is being instantiated by calling TimetableWindow#fillInnerParts() to initialize the UI, and fill in the job list/detail for the corresponding parts.

-
Unschedule Window:
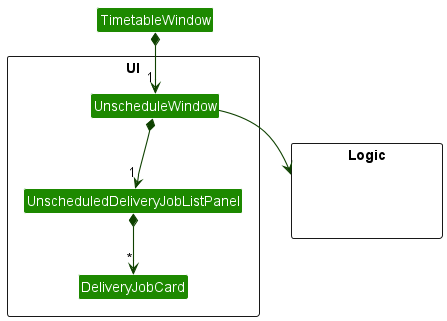
- displays the list of unscheduled jobs
- gets the unscheduled job list using
Logiccomponent:Logic#getUnscheduledDeliveryJobList() - remains up-to-date with the job list by using
ObservableList<DeliveryJob>#addListener()onLogic#getFilteredDeliveryJobList()- which will listen to changes made to the delivery job list.
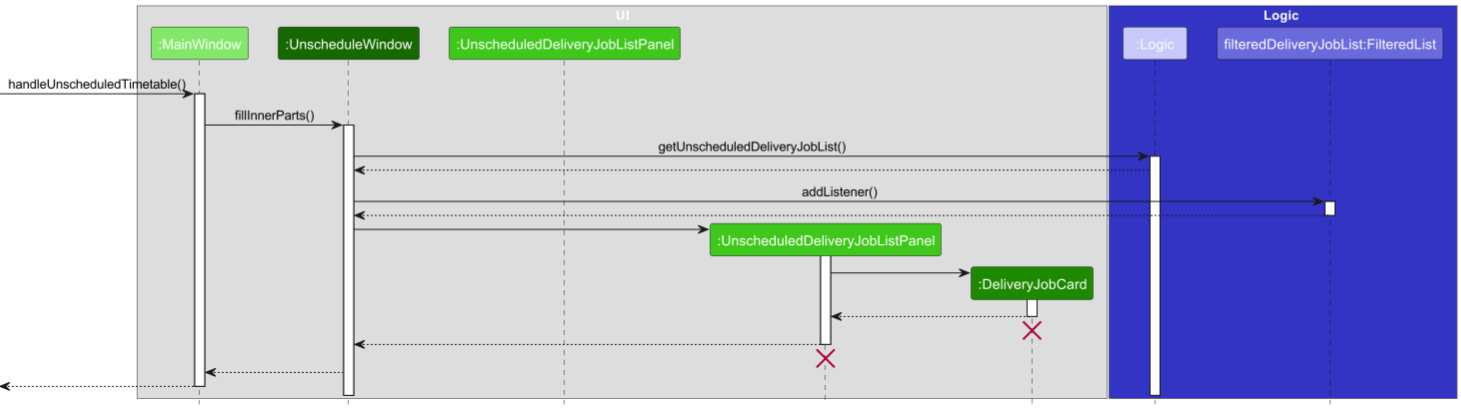
Upon calling MainWindow#handleUnscheduledTimetable(), the diagram below shows how UnscheduleWindow is being instantiated by calling UnscheduleWindow#fillInnerParts() to initialize the UI, and fill in the job list for the corresponding parts.
-
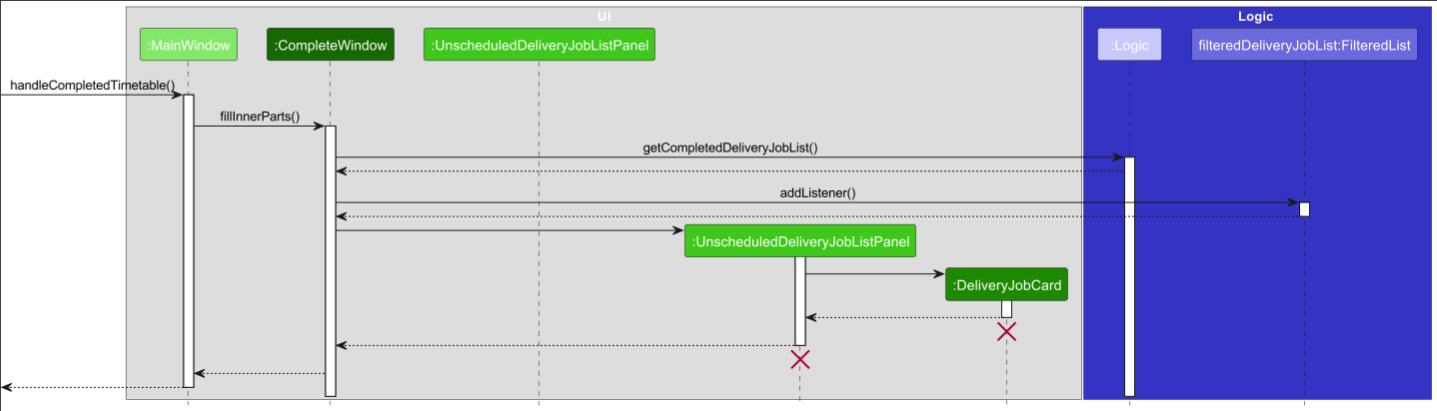
Complete Window:

- displays the list of completed jobs
- gets the completed job list using
Logiccomponent:Logic#getCompletedDeliveryJobList() - remains up-to-date with the job list by using
ObservableList<DeliveryJob>#addListener()onLogic#getFilteredDeliveryJobList()- which will listen to changes made to the delivery job list.
Upon calling MainWindow#handleCompletedTimetable(), the diagram below shows how CompleteWindow is being instantiated by calling CompleteWindow#fillInnerParts() to initialize the UI, and fill in the job list for the corresponding parts.
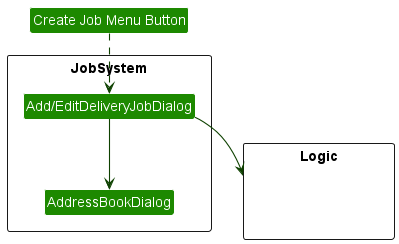
Create Job Window
- executes create/edit delivery job commands using the
Logiccomponent. - it can handle both create and edit mode for delivery jobs.
- it returns the command execution result through a callback handler.
- it opens a address book dialog for user to choose the sender and recipient for the job.
Logic component
API : Logic.java
Here’s a (partial) class diagram of the Logic component:
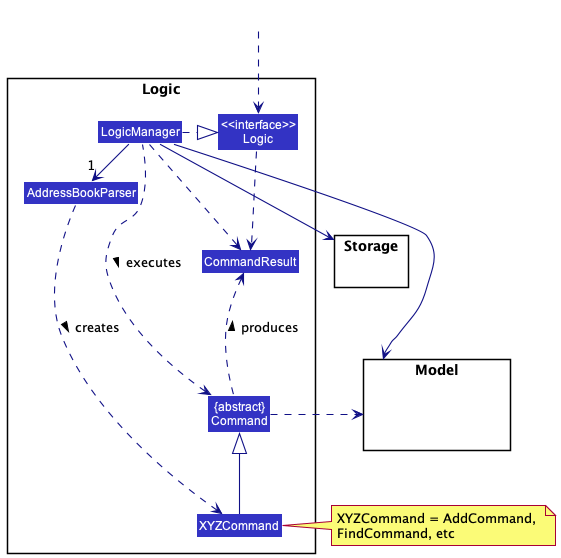
How the Logic component works:
- When
Logicis called upon to execute a command, it uses theAddressBookParserclass to parse the user command. - This results in a
Commandobject (more precisely, an object of one of its subclasses e.g.,AddCommand) which is executed by theLogicManager. - The command can communicate with the
Modelwhen it is executed (e.g. to add a person). - The result of the command execution is encapsulated as a
CommandResultobject which is returned back fromLogic.
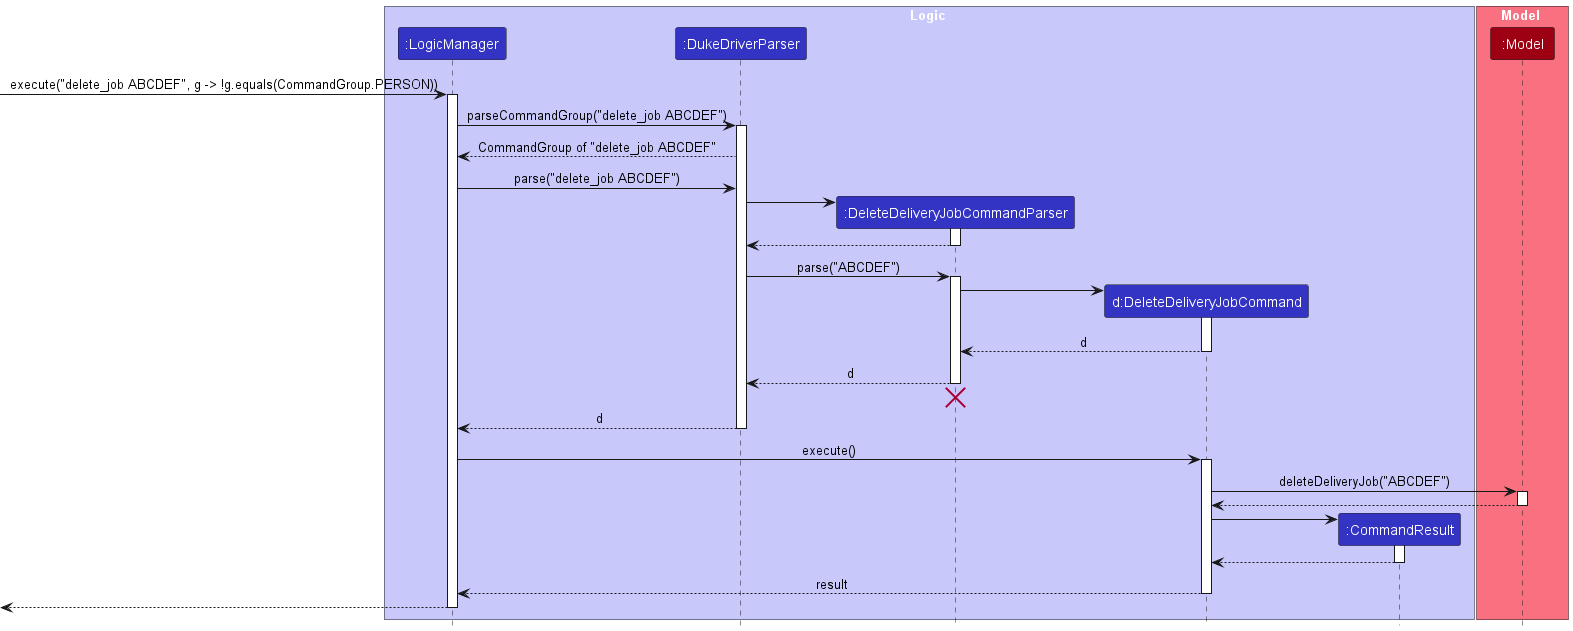
The Sequence Diagram below illustrates the interactions within the Logic component for the execute("delete_job ABCDEF") API call (accessed from Main Window):
Another example would be execute("delete 1") - accessed from Customers’ Window:
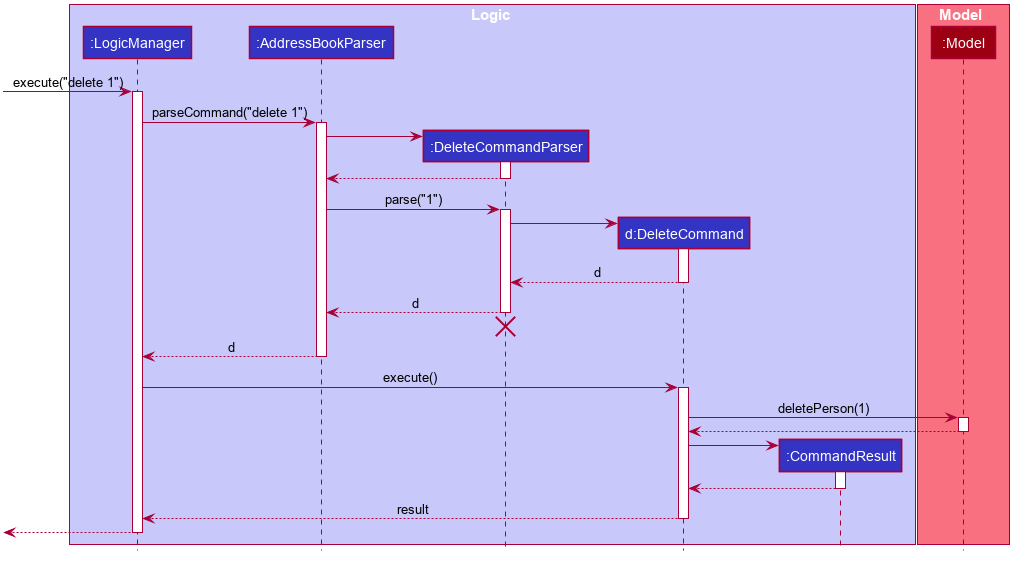
DeleteCommandParser should end at the destroy marker (X) but due to a limitation of PlantUML, the lifeline reaches the end of diagram.
Here are the other classes in Logic (omitted from the class diagram above) that are used for parsing a user command:
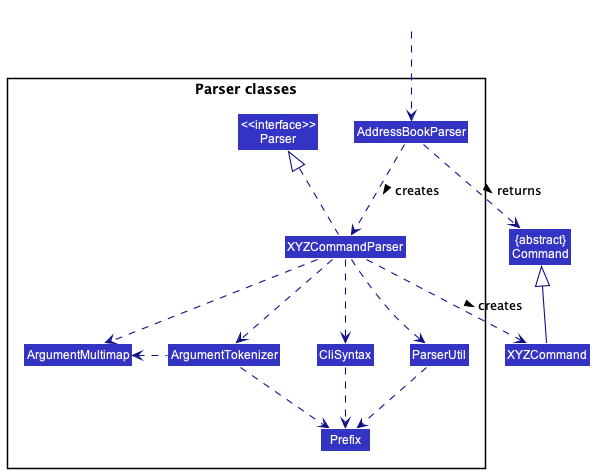
How the parsing works:
- When called upon to parse a user command, the
AddressBookParserclass creates anXYZCommandParser(XYZis a placeholder for the specific command name e.g.,AddCommandParser) which uses the other classes shown above to parse the user command and create aXYZCommandobject (e.g.,AddCommand) which theAddressBookParserreturns back as aCommandobject. - All
XYZCommandParserclasses (e.g.,AddCommandParser,DeleteCommandParser, …) inherit from theParserinterface so that they can be treated similarly where possible e.g, during testing.
Model component
API : Model.java
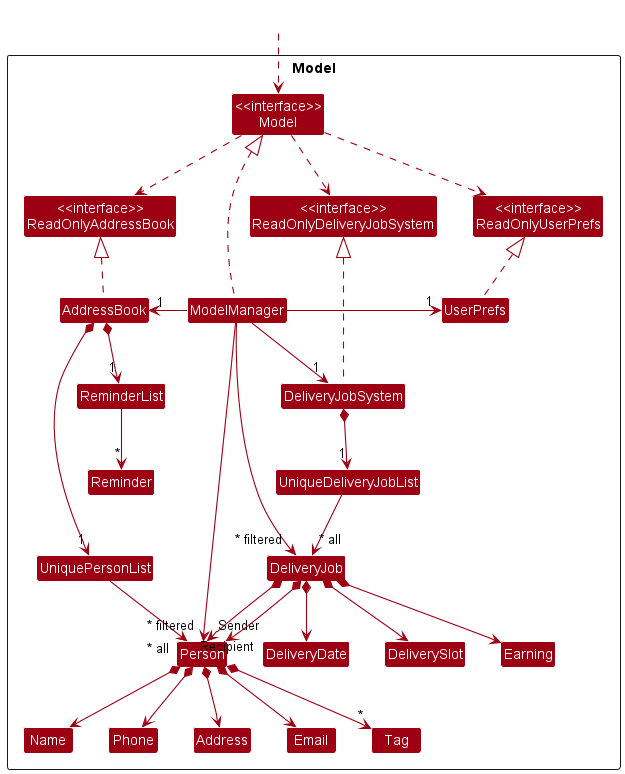
The Model component,
- stores the address book data i.e., all
Personobjects (which are contained in aUniquePersonListobject) andReminderObjects (which are contained in aReminderListobject). - store the delivery job system data (all
DeliveryJobobjects are contained in aUniqueDeliveryJobListobject). - stores the currently ‘selected’
DeliveryJobobjects (e.g., results of a search query) as a separate filtered list which is exposed to outsiders as an unmodifiableObservableList<DeliveryJob>that can be ‘observed’ e.g. the UI can be bound to this list so that the UI automatically updates when the data in the list change. - stores a
UserPrefobject that represents the user’s preferences. This is exposed to the outside as aReadOnlyUserPrefobjects. - does not depend on any of the other three components (as the
Modelrepresents data entities of the domain, they should make sense on their own without depending on other components) - The address book structure largely remains the same.
Tag list in the AddressBook, which Person references. This allows AddressBook to only require one Tag object per unique tag, instead of each Person needing their own Tag objects.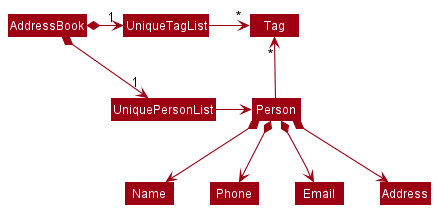
Storage component
API : Storage.java
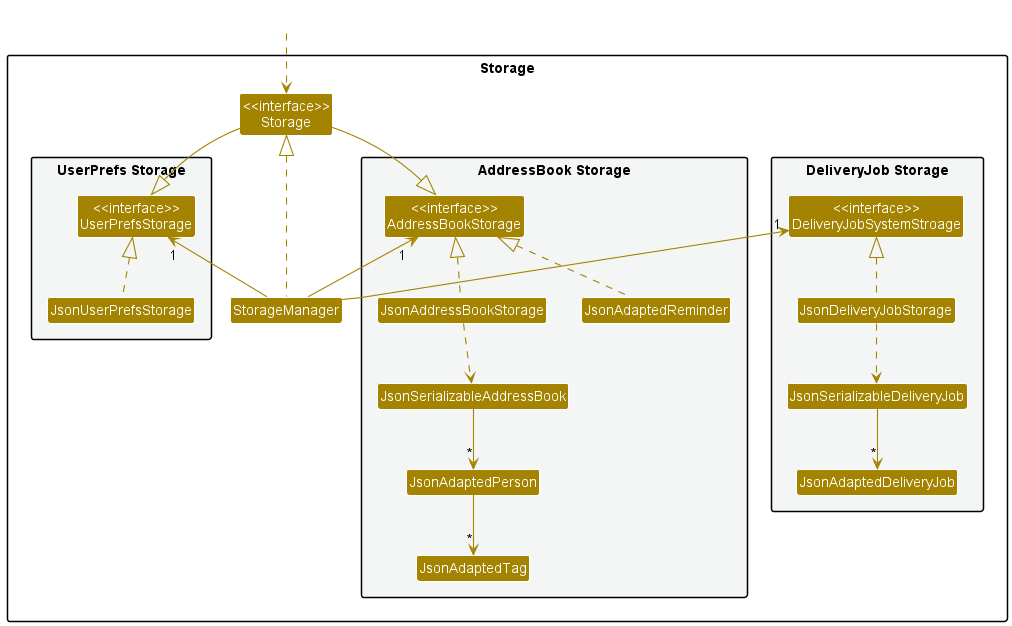
The Storage component,
- can save delivery job system, address book data and user preference data in json format, and read them back into corresponding objects.
- inherits from
DeliveryJobSystemStorage,AddressBookStorageandUserPrefStorage, which means it can be treated as either one (if only the functionality of only one is needed). - depends on some classes in the
Modelcomponent (because theStoragecomponent’s job is to save/retrieve objects that belong to theModel)
Common classes
Classes used by multiple components are in the seedu.address.commons package.
Implementation
This section describes some noteworthy details on how certain features are implemented.
[Proposed] Undo/redo feature
Proposed Implementation
The proposed undo/redo mechanism is facilitated by VersionedAddressBook. It extends AddressBook with an undo/redo history, stored internally as an addressBookStateList and currentStatePointer. Additionally, it implements the following operations:
-
VersionedAddressBook#commit()— Saves the current address book state in its history. -
VersionedAddressBook#undo()— Restores the previous address book state from its history. -
VersionedAddressBook#redo()— Restores a previously undone address book state from its history.
These operations are exposed in the Model interface as Model#commitAddressBook(), Model#undoAddressBook() and Model#redoAddressBook() respectively.
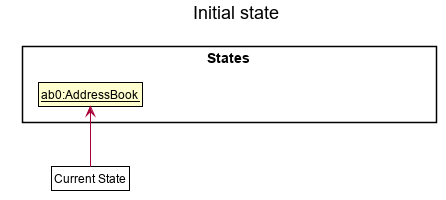
Given below is an example usage scenario and how the undo/redo mechanism behaves at each step.
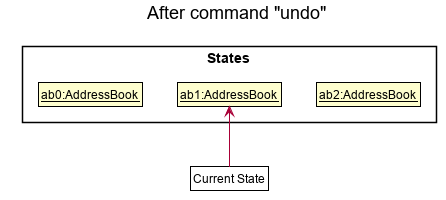
Step 1. The user launches the application for the first time. The VersionedAddressBook will be initialized with the initial address book state, and the currentStatePointer pointing to that single address book state.
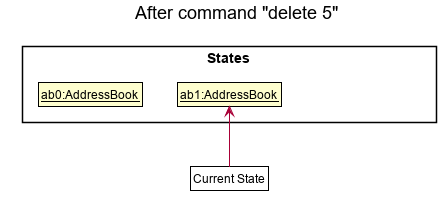
Step 2. The user executes delete 5 command to delete the 5th person in the address book. The delete command calls Model#commitAddressBook(), causing the modified state of the address book after the delete 5 command executes to be saved in the addressBookStateList, and the currentStatePointer is shifted to the newly inserted address book state.
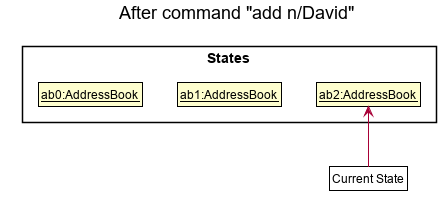
Step 3. The user executes add n/David … to add a new person. The add command also calls Model#commitAddressBook(), causing another modified address book state to be saved into the addressBookStateList.
Model#commitAddressBook(), so the address book state will not be saved into the addressBookStateList.
Step 4. The user now decides that adding the person was a mistake, and decides to undo that action by executing the undo command. The undo command will call Model#undoAddressBook(), which will shift the currentStatePointer once to the left, pointing it to the previous address book state, and restores the address book to that state.
currentStatePointer is at index 0, pointing to the initial AddressBook state, then there are no previous AddressBook states to restore. The undo command uses Model#canUndoAddressBook() to check if this is the case. If so, it will return an error to the user rather
than attempting to perform the undo.
The following sequence diagram shows how the undo operation works:
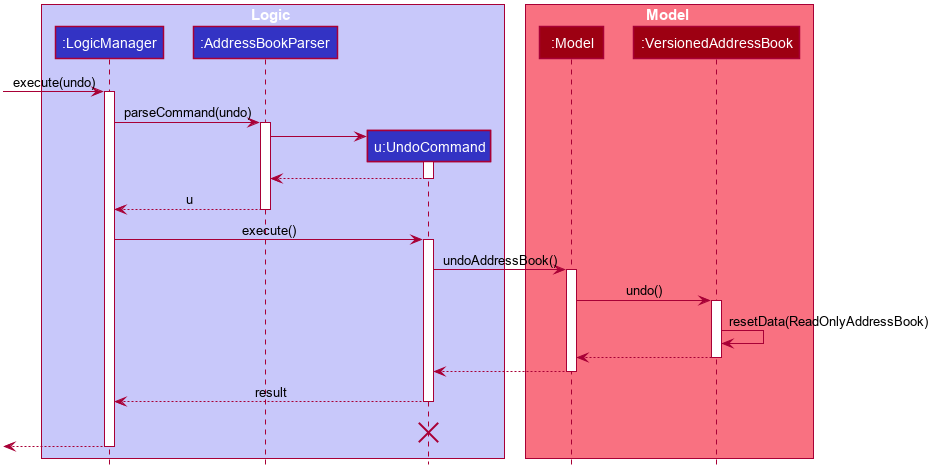
UndoCommand should end at the destroy marker (X) but due to a limitation of PlantUML, the lifeline reaches the end of diagram.
The redo command does the opposite — it calls Model#redoAddressBook(), which shifts the currentStatePointer once to the right, pointing to the previously undone state, and restores the address book to that state.
currentStatePointer is at index addressBookStateList.size() - 1, pointing to the latest address book state, then there are no undone AddressBook states to restore. The redo command uses Model#canRedoAddressBook() to check if this is the case. If so, it will return an error to the user rather than attempting to perform the redo.
Step 5. The user then decides to execute the command list. Commands that do not modify the address book, such as list, will usually not call Model#commitAddressBook(), Model#undoAddressBook() or Model#redoAddressBook(). Thus, the addressBookStateList remains unchanged.

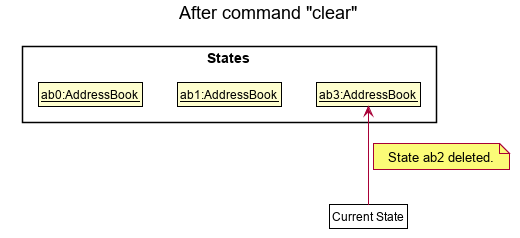
Step 6. The user executes clear, which calls Model#commitAddressBook(). Since the currentStatePointer is not pointing at the end of the addressBookStateList, all address book states after the currentStatePointer will be purged. Reason: It no longer makes sense to redo the add n/David … command. This is the behavior that most modern desktop applications follow.
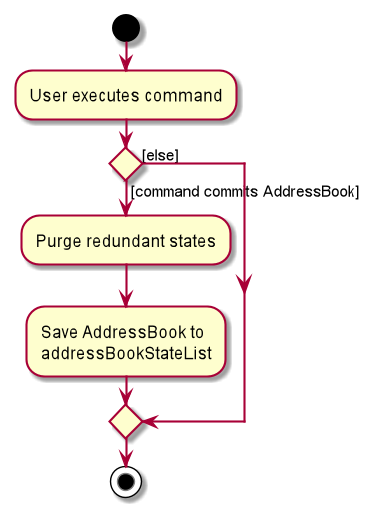
The following activity diagram summarizes what happens when a user executes a new command:
Design considerations:
Aspect: How undo & redo executes:
-
Alternative 1 (current choice): Saves the entire address book.
- Pros: Easy to implement.
- Cons: May have performance issues in terms of memory usage.
-
Alternative 2: Individual command knows how to undo/redo by
itself.
- Pros: Will use less memory (e.g. for
delete, just save the person being deleted). - Cons: We must ensure that the implementation of each individual command are correct.
- Pros: Will use less memory (e.g. for
Delivery Job System
Implementation
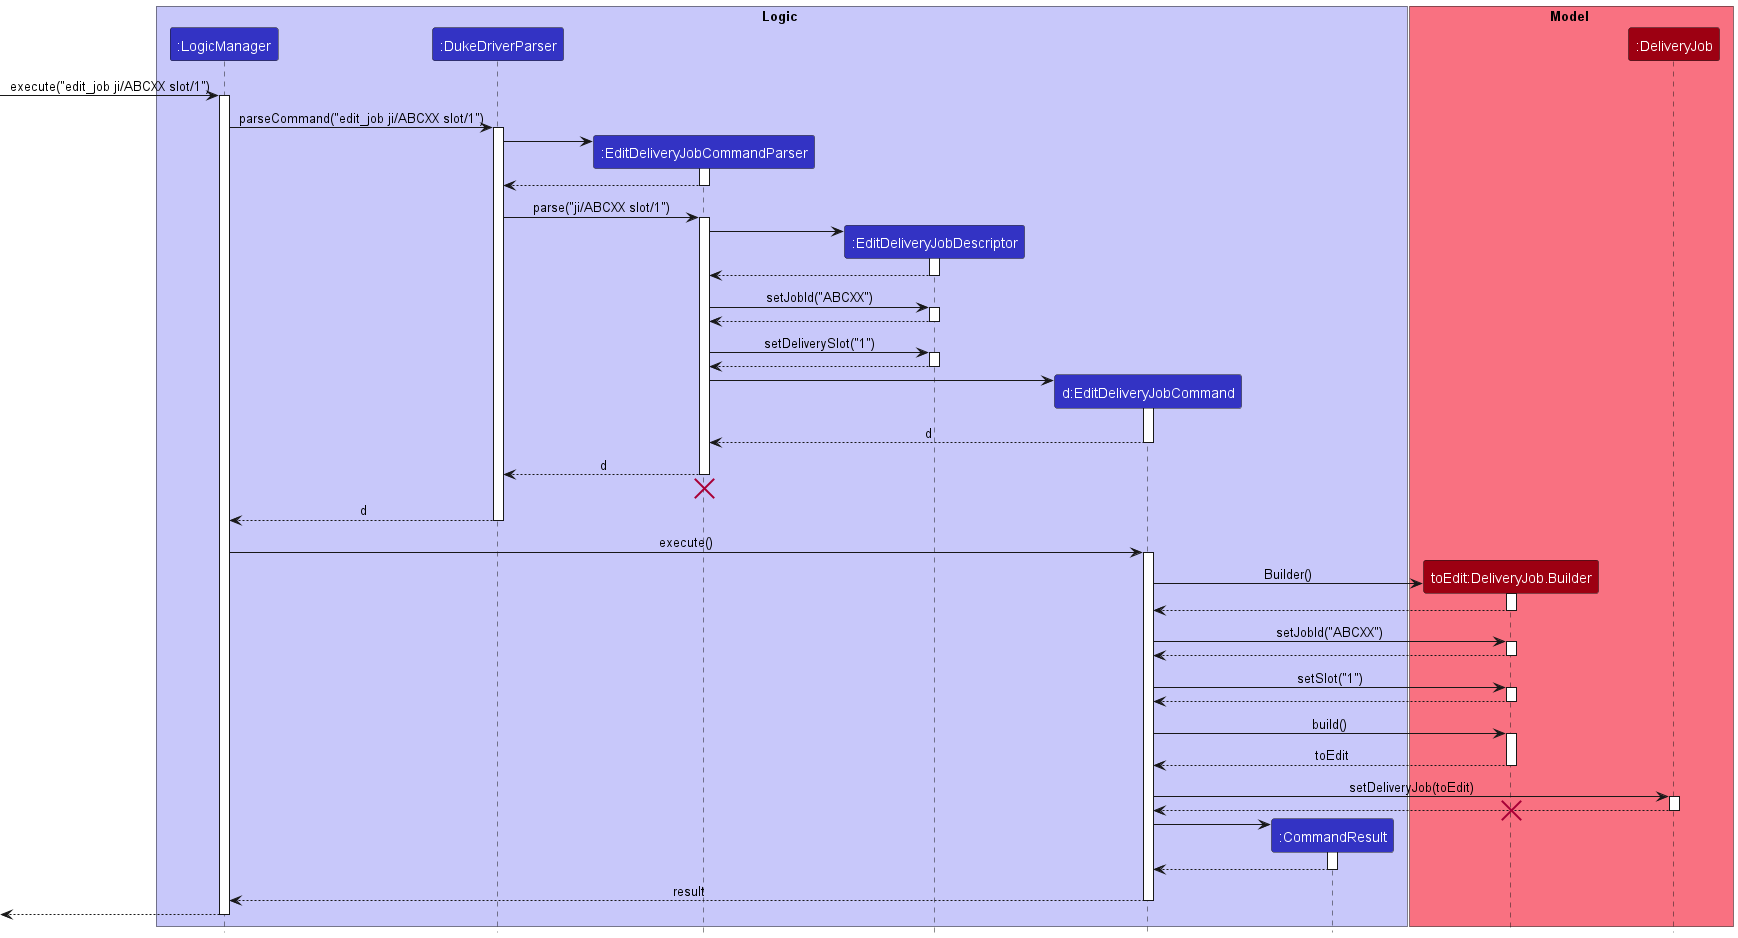
1. Edit job command
Given below is an example usage scenario and how the update job mechanism behaves at each step. The other job system commands follow a similar execution pattern with their own command logics.
GUI Mode: Step 1. The user launches the application for the first time. Step 2. The user selects a job to be updated. Step 3. The user edits preexisting inputs to update the job.
The command pattern was followed closely with difference only in the execution layer where the EditDeliveryJobCommand constructs a DeliveryJob object through a builder pattern.
The builder construct was initially introduced to handle optional and null arguments from find_job command and GUI. Here, we are reusing the builder to construct a DeliveryJob class.
The builder class returns a DeliveryJob object only when EditDeliveryJobCommand calls the DeliveryJob.Builder#build() method.
Operation resume to standard process from this point onwards.
The following sequence diagram shows how the update operation works:
2. Delete job command
Similarly to edit_job, we have an example for the implementation for Delete Delivery Job command:
Given below is an example usage scenario and how the delete job mechanism behaves at each step. The logic is quite similar to edit_job command.
GUI Mode: Step 1. The user launches the application for the first time. Step 2. The user selects a job to delete. Step 3. The user deletes the job by using the corresponding button.
The command pattern was followed closely with difference only in the execution layer where the DeleteDeliveryJobCommand prompts Model to delete the job.
Operation resume to standard process from this point onwards.
The following sequence diagram shows how the update operation works:
In this example, user input is delete_job ABCDEF. The logic for add_job command is similar to this.
Timetable feature
Implementation
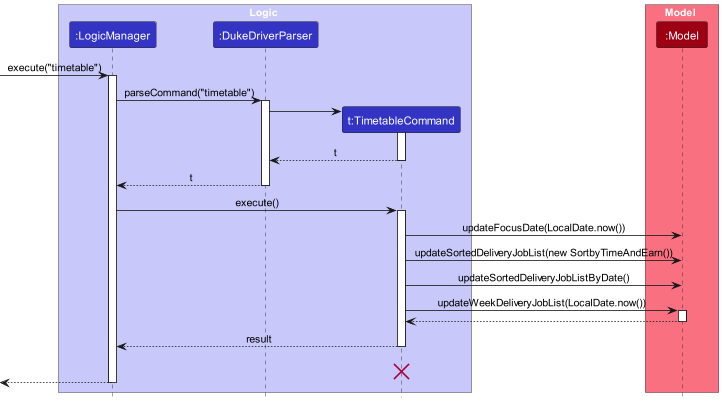
1. Display timetable of specific week (current week or week specified by users)
Given below is an example usage scenario and how the timetable mechanism behaves at each step.
Step 1. The user launches the application for the first time.
Step 2. The user inputs a series of commands to modify the state of the deliveryJobList.
Model#commitDeliveryJob(), so the delivery job list state will not be saved into the deliveryJobListSystem.
Step 4. The user now wants to view timetable of the current week by executing the timetable command. The timetable command will call Model#updateFocusDate(LocalDate.now()), Model#updateSortedDeliveryJobList(), Model#updateSortedDeliveryJobListByDate() and Model#updateWeekDeliveryJobList. The sorter functions will re-sort the most updated delivery job list by date. Then, Model#updateWeekDeliveryJobList will update the week job list to the specific week’s job list.
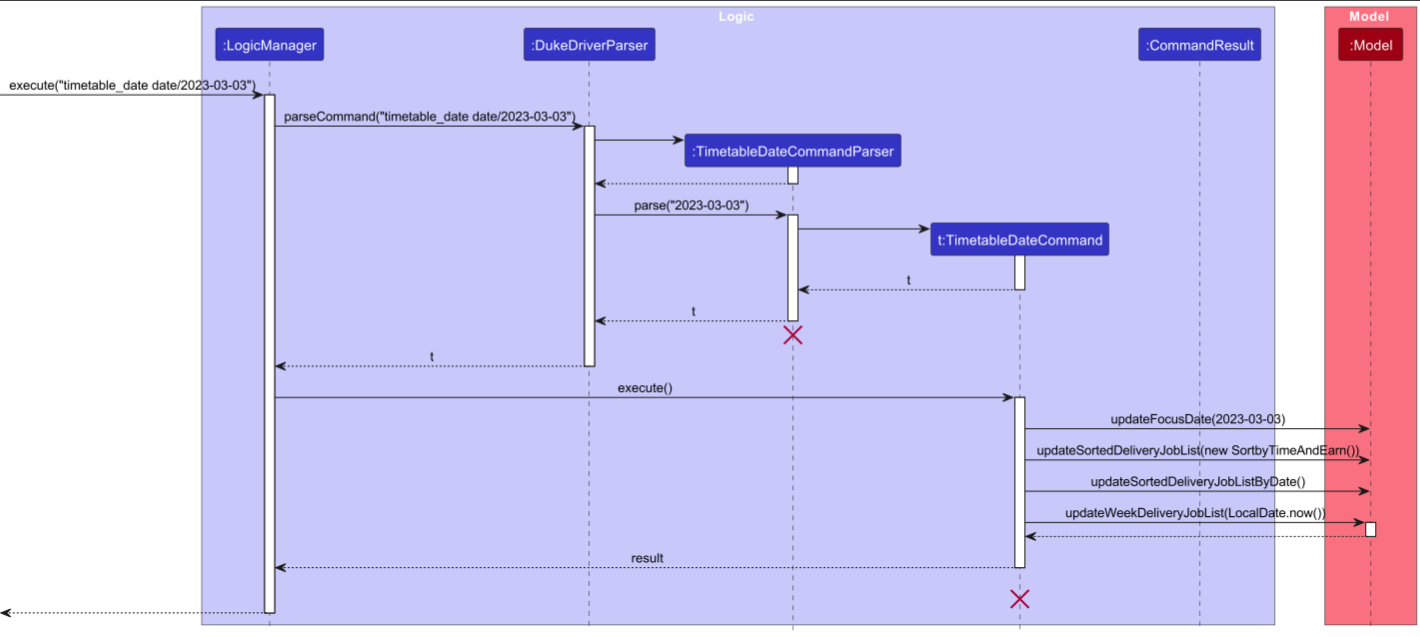
The timetable_date command is quite similar — it calls Model#updateFocusDate() using the date specified by user, before calling Model#updateSortedDeliveryJobList(), Model#updateSortedDeliveryJobListByDate() and Model#updateWeekDeliveryJobList, which will update the job list in the week according to the given date.
The following sequence diagram shows how the timetable operation works:
The following sequence diagram shows how the timetable_date operation works:
TimetableCommand should end at the destroy marker (X) but due to a limitation of PlantUML, the lifeline reaches the end of diagram.
Design considerations:
Aspect: How timetable executes:
-
Alternative 1 (current choice): Timetable uses sorted job list which saves the entire delivery job list system.
- Pros: Easy to implement.
- Cons: May have performance issues in terms of memory usage.
-
Alternative 2: Individual command knows which date to show timetable of specific week - timetable will only need to use job list of specific week.
- Pros: Will use less memory.
- Cons: We must ensure that the implementation of each individual command are correct.
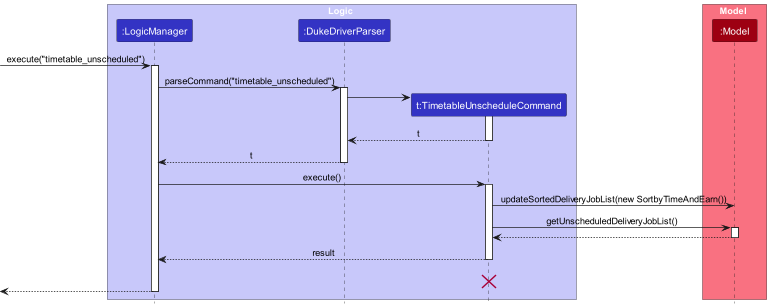
2. Display list of unscheduled or completed jobs
Given below is an example usage scenario and how the mechanism for showing list of unscheduled or completed jobs behaves at each step.
Step 1. The user launches the application for the first time.
Step 2. The user inputs a series of commands to modify the state of the deliveryJobList.
Model#commitDeliveryJob(), so the delivery job list state will not be saved into the deliveryJobListSystem.
Step 4. The user now wants to view list of unscheduled or completed jobs by executing the timetable_unscheduled or timetable_completed command.
The timetable_unscheduled/timetable_completed command will call Model#updateSortedDeliveryJobList() and Model#getUnscheduledDeliveryJobList() or Model#getCompletedDeliveryJobList() correspondingly.
The sorter functions will re-sort the most updated delivery job list by date. Then, the model will proceed to update the lists of unscheduled or completed jobs.
The following sequence diagram shows how the timetable_unscheduled operation works:
The following sequence diagram shows how the timetable_completed operation works:
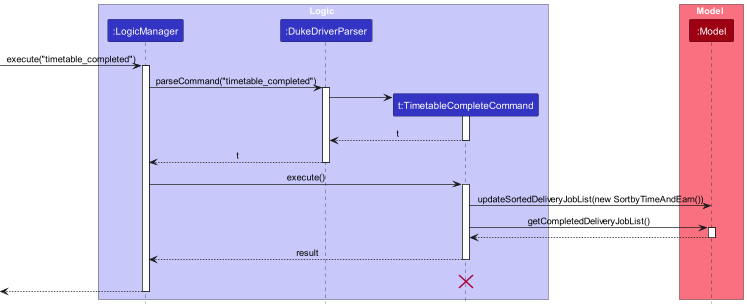
TimetableCommand should end at the destroy marker (X) but due to a limitation of PlantUML, the lifeline reaches the end of diagram.
Statistics feature
Allow the user to view summary statistics about the delivery jobs.
Implementation
Given below is an example usage scenario and how the statistics mechanism behaves at each step.
Step 1. The user launches the application for the first time.
Step 2. The user inputs a series of commands to modify the state of the deliveryJobList.
Step 3. The user now wants to view a summary of the statistics of the jobs in the deliveryJobList.
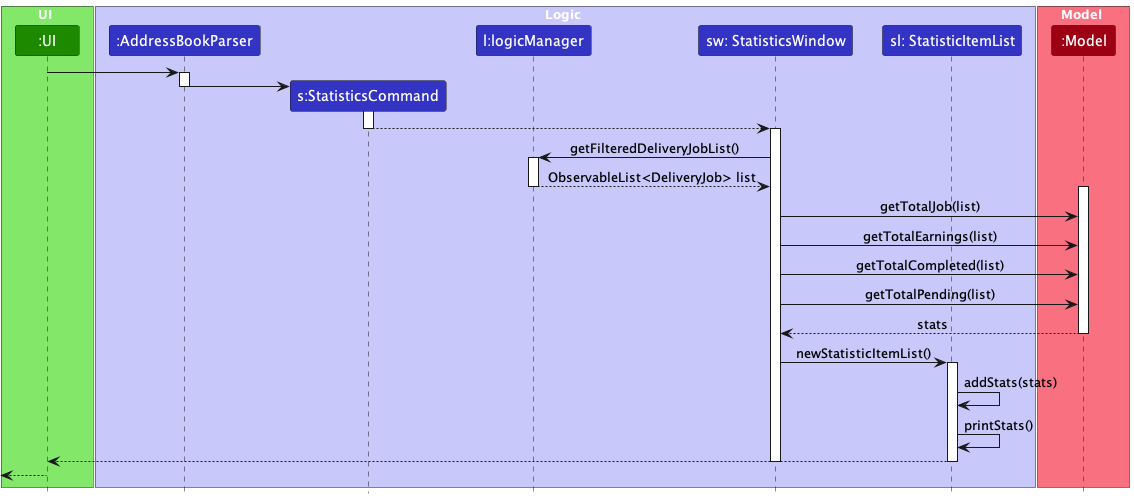
The stats command will open up the statistics window, where a list of statistics will be shown.
The stats command will call Logic#getFilteredDeliveryJobList() which will return a list of delivery jobs.
The statistics is then generated based on the list of delivery jobs and shown to the user in the Statistics Window.
The following sequence diagram shows how the statistics operation works:
Design considerations:
Aspect: How statistics are stored:
-
Alternative 1 (current choice): Saves each statistic as a Statistic object in the list
- Pros: Easy to store and display statistics
- Cons: May have performance issues in terms of memory usage and execution delay.
-
Alternative 2: Display each statistic individually
- Pros: Will use less memory and faster to execute
- Cons: Will make code longer and increases coupling
Notification feature
Implementation
The Notification feature is facilitated by an external library, ControlsFx.
It is an open source project for JavaFX that aims to provide really high quality UI controls and other tools to
complement the core JavaFX distribution. The mechanism is handled by NotificationManager, which implements the
following operations:
-
NotificationManager#checkReminderList()— Check against thereminderListfound inModeland display a reminder notification withNotificationManager#show(). -
NotificationManager#checkNowSchedule()— Check against the timetable to create a notification of scheduled jobs to be carried out at in the present scheduled slot. Displays notification withNotificationManager#show(). -
NotificationManager#checkNextSchedule()— Check against the timetable to create a notification of upcoming scheduled jobs to be carried out in the next scheduled slot. Displays notification withNotificationManager#show(). -
NotificationManager#show()— Creates the actual notification with details picked up by the other methods, and displays it on the screen.
Additionally, to allow notifications to display even when the app is running in the background, TimerTask and Timer from java.util is utilised. This mechanism is started by
BackgroundNotificationScheduler, which schedules 2 TimerTask:
-
BackgroundReminderTask— RunsNotificationManager#checkReminderList(). This task is scheduled every minute after the app has run. It will not show notifications of reminders that it has already shown (this check resets after the app shutdown). -
BackgroundScheduleTask— RunsNotificationManager#checkNextSchedule(). This task is scheduled 20 minutes before the next scheduled slot to display upcoming scheduled jobs. If the current time is after the last slot timing, no notification for upcoming jobs will be displayed until the end of the day.
Given below is an example of the usage scenario and how the Notification feature behaves at each step.
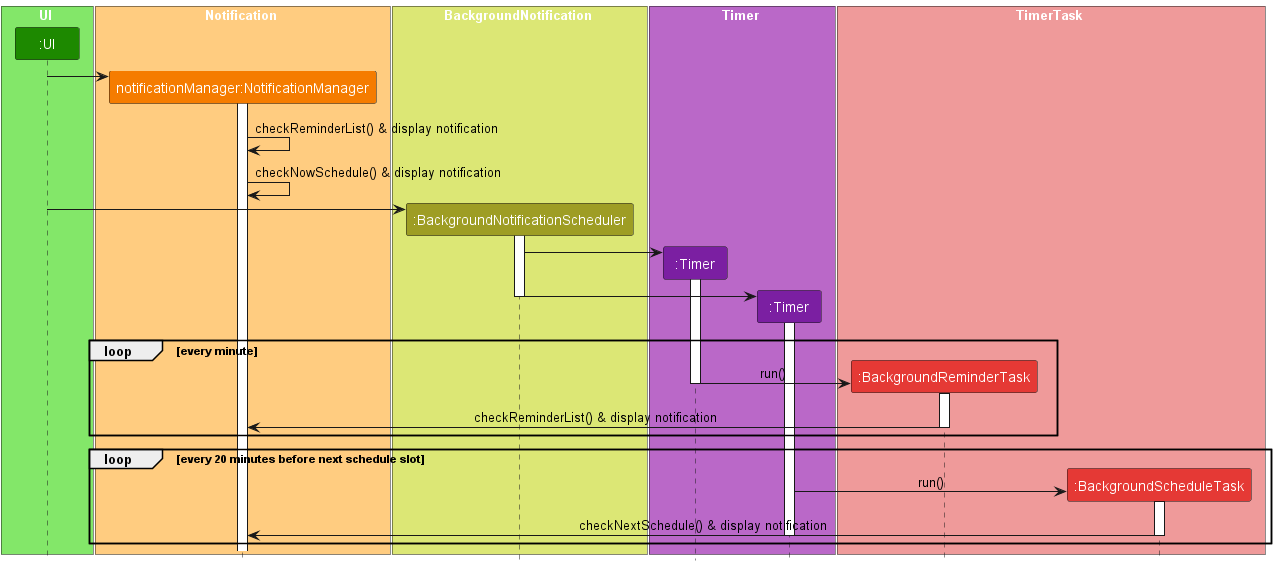
Step 1. The user launches the application. UiManager will create an instance of NotificationManager.
Step 2. The instance of NotificationManager will then call NotificationManager#checkReminderList() and NotificationManager#checkNowSchedule(), which will display the corresponding notifications
Step 3. An instance of BackgroundNotificationScheduler will be created and its BackgroundNotificationScheduler#run() function will be called to schedule the 2 TimerTask.
Step 4. At the appropriate timings, NotificationManager#checkReminderList() and NotificationManager#checkNextSchedule() will run and display the appropriate notifications accordingly.
hasShown attribute in Reminder and tracking the
isDismissed variable in NotificationManager.
The following sequence diagram shows how the Notification feature works:
Design considerations:
Aspect: How background notifications run its checks:
-
Alternative 1 (current choice):
TimerTaskandTimer- Pros: Easy to implement. Better OOP.
- Cons: Cannot run random checks against the current time or date.
-
Alternative 2:
Thread- Pros: Allows random checks against the current time or date.
- Cons: May slow down the app, or worst case scenario, hang the app.
Documentation, logging, testing, configuration, dev-ops
Appendix: Requirements
Product scope
Target user profile: Delivery man
- has a need to manage a significant number of contacts
- prefer desktop apps over other mediums
- can type fast
- prefers typing over mouse interactions
- is reasonably comfortable using CLI apps
- delivery man with >50 deliveries in a day
- drives constantly with a laptop in the van
- lazy, doesn’t like to micromanage
- forgetful
Value proposition:
- Manage contacts faster than a typical mouse/GUI driven app.
- Helps delivery men to stay on track with their delivery schedule.
- Assists delivery men to structure their upcoming tasks.
- Manage job lists and customers’ contacts - keep their information descriptive and updated/concise information.
User stories
Priorities: High (must have) - * * *, Medium (nice to have) - * *, Low (unlikely to have) - *
| Priority | As a … | I want to … | So that I can… |
|---|---|---|---|
* * * |
new delivery driver and Duke Driver user | see usage instructions | refer to instructions when I forget how to use the App |
* * * |
delivery driver | add/delete jobs | keep track of my upcoming and old jobs |
* * * |
delivery driver | mark/unmark jobs | keep track of completed jobs |
* * * |
organised and busy delivery driver | search for jobs in my Duke Driver job list | easily find the information that I need without having to go through the entire list |
* * * |
busy delivery driver | mass import job list from file to Duke Driver | easily move my data between devices or other apps. |
* * * |
delivery driver | add a new person | keep in touch with my clients |
* * * |
delivery driver | delete a person | remove entries that I no longer need |
* * * |
organised delivery driver | find a person by their information | locate details of persons without having to go through the entire list |
* * * |
busy Duke Driver user | edit existing contacts in my address book | update their information if it changes |
* * * |
busy Duke Driver user | edit existing jobs in my Duke Driver job list | update their information if it changes |
* * * |
forgetful person | received notifications/be reminded of upcoming tasks and deadlines | complete all my jobs on time and not forget a task |
* * * |
forgetful person | add reminders to the app | complete all my jobs on time and not forget a task |
* * * |
organised person | delete reminders from the app | keep myself updated to my progress |
* * * |
busy person | snooze reminders | ignore/forget about jobs that I am not able to complete at the scheduled time |
* * * |
busy person | view list of reminders | keep track of my progress |
* * * |
organised user | be prepared for upcoming tasks and deadlines | plan for my next schedule |
* * * |
busy and organised person | view schedule of my tasks in a week | organise my timetable/to-do list and keep track/complete everything on time |
* * * |
busy and organised person | view list of completed and unscheduled jobs | keep track of my work |
* * * |
productive and motivated delivery driver | view statistics of my jobs and earnings | keep track of my work and get motivated to work harder |
* * |
delivery driver | hide private contact details | minimize chance of someone else seeing them by accident |
* * |
delivery driver who wants to learn how to maximise his earnings | view my aggregated information | track my earnings and other statistics |
* |
delivery driver with many jobs in Duke Driver | sort and filter jobs | locate jobs easily and thus increase delivery efficiency |
* |
user | adjust how my notifications are shown | have a clutter free desktop |
* |
picky person | decide on and design how my timetable will look like | view my timetable more easily and to my liking |
Use cases
(For all use cases below, the System is the Duke Driver and the Actor is the user, unless specified otherwise)
[ST1] View statistics
MSS
- User is on homepage of list of jobs.
- User requests to view overall statistics.
- System shows total earnings, statistics on jobs completed/pending in total and in the previous week.
Use case ends.
Extensions
- 2a. The list is empty.
Use case ends.
[DE1] View delivery job detail
MSS
- User opens the system.
- System list all pending jobs.
- User selects the job for details.
- System displays the full detail of the delivery job.
Use case ends.
Extensions
- 2a. The list is empty.
Use case ends.
[DE2] Add a delivery job
MSS
- User is on homepage of list of jobs.
- User requests to add a job in the list.
- System adds job and job appears in list of jobs.
Use case ends.
[DE3] Delete a delivery job
MSS
- User is on homepage of list of jobs.
- System shows a list of jobs.
- User requests to delete a specific job in the list.
- System deletes the job.
Use case ends.
Extensions
- 2a. The list is empty.
Use case ends. - 3a. The given index is invalid.
- 3a1. System shows an error message.
Use case resumes at step 2.
- 3a1. System shows an error message.
[DE4] Edit a delivery job
MSS
- User is on homepage of list of jobs.
- System shows a list of jobs.
- User requests to edit a specific job in the list.
- User fill in and submit the changes.
- System update the job and list the new information.
Use case ends.
Extensions
- 2a. The list is empty.
Use case ends. - 3a. The given index is invalid.
- 3a1. System shows an error message.
Use case resumes at step 2.
- 3a1. System shows an error message.
[DE5] Find a delivery job
MSS
- User is on homepage of list of jobs.
- System shows a list of jobs.
- User requests search for a job with options.
- System displays search results that matches the query.
Use case ends.
Extensions
- 3a. Invalid search option given.
- 3a1. System shows an error message.
Use case resumes at step 2.
- 3a1. System shows an error message.
- 4a. No item matches the query options.
- 4a. System shows empty list.
Use case resumes at step 2.
- 4a. System shows empty list.
[TT1] Display timetable of scheduling tasks of current week
MSS
- User requests to display timetable by selecting Timetable option on homepage.
- System displays timetable of uncompleted/upcoming jobs in current week in Timetable Window.
Use case ends.
[TT2] Display timetable of scheduling tasks of week containing a specific date
MSS
- User requests to display timetable of specific week containing a specific date.
- System displays timetable of uncompleted/upcoming jobs in the week in Timetable Window.
Use case ends.
[TT3] Display list of unscheduled/completed jobs
MSS
- User requests to display list of unscheduled/completed jobs.
- System displays list of unscheduled/completed jobs in Unscheduled/Completed Window.
Use case ends.
[RE1] Alert scheduled jobs
MSS
- User starts up System.
- System checks the time.
- If the current timing falls more than 20 mins before a timetable slot, System will check if there is any current job. If yes, it will count and alert the user through the notification feature.
- System runs in the background to only check the timetable for upcoming jobs.
System will repeat step 2 every hour, 20 mins before the next timetable slot.
Use case ends.
Extensions
- 3a. If the current time is within 20 mins before the next timetable slot
- 3a1. System will check the next timetable slot and count number of upcoming jobs.
- 3a2. Alert the user through the notification feature.
- 3b. If the current time is before the first timetable slot.
- 3b1. System will check in the first timetable slot and count number of upcoming jobs.
- 3b2. Alert the user through the notification feature.
- 3c. If the current time is after the last timetable slot
- 3c1. System will not check for any or upcoming scheduled jobs.
Use case resumes from step 4.
- 3c1. System will not check for any or upcoming scheduled jobs.
[RE2] Alert reminders
MSS
- User starts up System.
- System loads address book from memory.
- System checks from address book, list of reminders. If the current date and time has pass or is equal to the date specified in a reminder, System will count it as an active reminder.
- System will display the number of active notifications.
- System runs in the background to check against the list of reminders after every minute.
System will repeat the check at step 3.
Use case ends.
Extensions
- 4a. User can dismiss the reminder. Doing will prevent the app from showing anymore notifications.
- 4a1. A new reminder is activated.
Use case resumes from step 4. - 4a2. No new reminder is activated.
Use case resumes from step 5
- 4a1. A new reminder is activated.
[RE3] Add reminders
MSS
- User details the description, date and time of a reminder to the System.
- System adds the reminder into the reminder list.
Use case ends.
Extensions
- 2a. date and time of reminder is not provide.
- 2a1. System will prompt user again.
Use case resumes from step 1.
- 2a1. System will prompt user again.
[RE4] Delete reminders
MSS
- User specifies a reminder to be deleted based on its index number.
- System finds the corresponding reminder, and deletes it from the reminder list.
Use case ends.
Extensions
- 2a. Index provided by user is not found in reminder list.
- 2a1. System will prompt user again.
Use case resumes from step 1.
- 2a1. System will prompt user again.
[RE5] List reminders
MSS
- User request System to show all reminders in reminder list.
- System displays all reminders.
Use case ends.
Non-Functional Requirements
- Should work on any mainstream OS as long as it has Java
11or above installed. - Should be used for a single user only i.e. (not a multi-user product).
- The system should respond within two seconds (after receiving input from user).
- A user with above average typing speed for regular English text (i.e. not code, not system admin commands) should be able to accomplish most of the tasks faster using commands than using the mouse.
Glossary
- Mainstream OS: Windows, Linux, Unix, OS-X
- Private contact detail: A contact detail that is not meant to be shared with others
- Customer/Client: Those who placed orders and created work for delivery men.
- GUI: Graphical User Interface
- PlantUML: An open-source tool allowing users to create diagrams from a plain text language. Refer to PlantUML.
- CLI: Command Line Interface
Appendix: Instructions for manual testing
Given below are instructions to test the app manually.
testers are expected to do more exploratory testing.
Launch and shutdown
- Initial launch
- Download the jar file and copy into an empty folder
- Double-click the jar file Expected: Shows the GUI with a set of sample contacts. The window size may not be optimum.
- Saving window preferences
- Resize the window to an optimum size. Move the window to a different location. Close the window.
- Re-launch the app by double-clicking the jar file.
Expected: The most recent window size and location is retained.
Address Book
- Open address book by command
- Prerequisites: Access to main window.
- Test case:
list
Expected: Customer address book window launched.
- Open address book by GUI
- Prerequisites: Access to main window.
- Test case:
Customermenu >Address Book
Expected: Customer address book window launched.
- Add a person
- Prerequisites: Access to Customers Window using the
listcommand. - Test case:
add n/John Doe p/98765432 e/johnd@example.com a/John street, block 123, #01-01
Expected: A new person with the nameJohn Doeadded to the list. - Other incorrect format to try:
- missing mandatory fields:
add n/John Doe e/johnd@example.com - invalid phone number:
add n/John Doe p/8 e/johnd@example.com
Expected: Error message displayed in result box.
- missing mandatory fields:
- Prerequisites: Access to Customers Window using the
- Edit a person
- Prerequisites: List all persons in Customers Window using the
listcommand. person to edit in the list. - Test case:
edit 1 p/81234567 e/johndoe@example.com
Expected: The phone number and email address of person at index 1 is updated. - Other incorrect format to try:
- invalid index:
edit 0 p/81234567
Expected: Error message displayed in result box.
- invalid index:
- Prerequisites: List all persons in Customers Window using the
- Find a person by name
- Prerequisites: List all persons in Customers Window using the
listcommand. target person in the list. - Test case:
find David
Expected: Matching person in the person list only. - Other incorrect format to try:
-
not found query:find abc
Expected: 0 persons listed.
-
- Prerequisites: List all persons in Customers Window using the
- Deleting a person while all persons are being shown
- Prerequisites: List all persons in Customers Window using the
listcommand. Multiple persons in the list. - Test case:
delete 1
Expected: First contact is deleted from the list. Details of the deleted contact shown in the status message. - Test case:
delete 0
Expected: No person is deleted. Error details shown in the status message. Status bar remains the same. - Other incorrect delete commands to try:
delete,delete x,...(where x is larger than the list size)
Expected: Similar to previous.
- Prerequisites: List all persons in Customers Window using the
Delivery Job System
- Add a job by command
- Prerequisites: User is in the main window. Valid recipient and sender id.
- Test case:
add_job si/DAVSAM ri/CHASAM earn/1
Expected: A delivery job is created without delivery schedule.
The sender should be DAVSAM and recipient should be CHASAM.
With earning value of $1. - Test case:
add_job si/DAVSAM ri/CHASAM earn/1 date/2024-05-01 slot/1
Expected: A delivery job is created with delivery schedule.
Similar to previous. - Other incorrect format to try:
-
add_job si/invalid_id ri/invalid_id earn/emptyinvalid argument supply. -
add_job si/... ri/... earn/... [date/...] [slot/...]with either date or slot given.
Expected: Error message displayed in result box.
-
- Add a job by GUI
- Prerequisites: User have access to GUI. Select
menu>Delivery Job System>Create Job. - Test case: fill in mandatory fields only (recipient/sender/earning)
Expected: Similar to1.2 - Test case: fill in all fields
Expected: Similar to1.3 - Other incorrect approach to try:
- sender/recipient: invalid person id.
- earning: multiple decimal points.
- date: invalid date.
Expected: Error message at the bottom of dialog.
- Prerequisites: User have access to GUI. Select
- Edit a job by command
- Prerequisites: Job to edit is valid.
- Test case:
edit_job 1 slot/4
Expected: The slot of job at index 1 is updated. - Test case:
edit_job ji/BECHE8833A slot/4
Expected: The slot of job with idBECHE8833Ais updated. - Other incorrect format to try:
- Invalid index:
edit_job 0 slot/4 - Invalid Job Id:
edit_job ji/BA slot/4
Expected: Error message displayed in result box.
- Invalid index:
- Edit a job by GUI
- Prerequisites: Access to edit job dialog.
- Test case:
MainWindow>Job Detail>🖊️button
Expected: The changes made is reflected in the detail pane after submission. - Other incorrect approach to try:
- Similar to create job GUI.
- Find a job
- Prerequisites: Target job is valid.
- Test case:
find_job ji/BECHE8833A
Expected: Job with idBECHE8833Adisplayed in the list. - Test case:
find_job date/2023-03-01 slot/4
Expected: Jobs that satisfies both date and slot conditions are displayed in the list. - Other incorrect format to try:
- Invalid command:
find_job
Expected: Error message displayed in result box.
- Invalid command:
- Delete a job
- Prerequisites: Job to delete is valid.
- Test case:
delete_job DAIR765586
Expected: Job with idDAIR765586removed from the list. - Test case:
select a job> pressdelkey
Expected: Job selected is removed. - Other incorrect format to try:
- Invalid command:
delete_job
Expected: Error message displayed in result box.
- Invalid command:
- Delete a job by Hot Key
- Prerequisites: Job to delete is in the list.
- Test case:
select a job> pressdelkey
Expected: Job selected is removed.
- Import jobs by GUI
- Prerequisites:
- File to be imported is prepared.
- File to be imported is in csv.
- File to be imported has header as specified in UG.
- File to be imported has no empty cells.
- File to be imported has “na” filled into optional cells.
- Test case:
click on DeliveryJobSystem in menu bar>click import jobs> select the csv file to be imported- Files are available for testing in docs.
- testimportfile.csv
- Expected: File is imported with new delivery jobs and new customers if customers do not already exist in address book.
- empty.csv (incorrect format to try)
- Expected: File is empty. Nothing is imported.
- some_na.csv (Some optional cells left empty)
- Expected: File is imported with new delivery jobs and new customers if customers do not already exist in address book.
- missingelements.csv (incorrect format to try)
- Missing elements in import. Check if there are empty cells.
- testimportfile.csv
- Files are available for testing in docs.
- Prerequisites:
Notifications
- Display a notification for a reminder
- Prerequisites: Added a reminder using the
add_remindercommand. Make sure thetime/field is set to an appropriate time. - Test case: Current time has pass indicated time for Reminder
Expected: After adding reminder, notification for that reminder should pop up at the next clock minute. - Test case: Current time has not pass indicated time for Reminder
Expected: No notification should show, unless clock minute has pass time indicated for reminder.
- Prerequisites: Added a reminder using the
- Snooze reminder notification
- Prerequisites: Reminder has been added, current time has pass time indicated in reminder, and notification is showing.
- Test case: Clicking on body of notification should open up the Reminder List Window, and dismiss the notification. Notification should not show up again at next clock minute, unless a new reminder has been activated.
- Due to the in-built nature of ControlsFX’s notification and how reminders are checked at every minute, expect the notification to disappear and appear again every minute.
- Display a notification for next Scheduled slot
- Prerequisites: Assign a job to an appropriate timetable slot.
- Test case: Once current time is 20 minutes before the next timetable slot (e.g. 10:40 to 10:59), a notification would pop up for the number of jobs assigned to the next timetable slot.
Timetable
- Display timetable for specific week containing a specific date from Main Window
- Prerequisites: User is at the main window.
- Command:
timetable(Show timetable of current week - LocalDate.now()) ortimetable date date/YYYY-mm-DD. The date should not be left empty. Alternative, fortimetablecommand, user can use GUI mode instead: Menu bar > Timetable > Scheduled jobs. - The output box in the window should show a message confirming that Timetable window is opened for the specific week containing the input date.
- The system should open Timetable for the specific week, showing job list in respective day and slot (if there are any jobs for that day - else, the column for the day will be empty).
- Display list of unscheduled jobs (i.e. jobs with invalid date and slot)
- Prerequisites: User is at the main window.
- Command:
timetable_unscheduledor GUI mode: Menu bar > Timetable > Unscheduled jobs. - The output box in the Main window should show a message confirming that Unscheduled job is opened for the specific week.
- The system should open the Unscheduled Window, showing list of unscheduled jobs and total number of unscheduled jobs.
- Display list of completed jobs
- Prerequisites: User is at the main window.
- Command:
timetable_completedor GUI mode: Menu bar > Timetable > Completed jobs. - The output box in the Main window should show a message confirming that Completed job is opened for the specific week.
- The system should open the Completed Window, showing list of completed jobs and total number of completed jobs.
- Display timetable for specific week containing a specific date from Timetable Window
- Prerequisites: User is at Timetable window - user may open this window by using
timetablecommand or GUI Mode: Menu bar > Timetable > Scheduled jobs from Main Window. Timetable of current week is shown in current Timetable Window. - Command:
timetable date date/YYYY-mm-DD. The date should not be left empty. - The output box in the Timetable window should show a message confirming that Timetable window is opened for the specific week which contains the input date.
- The system should display Timetable for the specific week, showing job list in respective day in the week and slot (if there are any jobs for that day - else, the column for the day will be empty).
- Prerequisites: User is at Timetable window - user may open this window by using
Statistics
- Display statistics of all jobs from Main Window
- Prerequisites: None.
- Command:
stats. Alternative, forstatscommand, user can use GUI mode instead: Menu bar > Statistics > Display Statistics. - The text in the window should show lists of statistics for current week’s and previous week’s jobs.
Appendix: Effort
As our application contains different windows and features, such as Timetable Window, Reminder Window,.. - one challenge that we had to face was deciding on the UI and design of our app. We learnt to work with JavaFX to open different windows when needed, and decide on the structure/design of each window to maintain good design principles. To make sure that Duke Driver is friendly to typing-preferred users, asides from including buttons on GUI mode, we also include commands for users to switch between windows.
Moreover, AB3 code base only consists of features supporting only Person class, meanwhile for Duke Driver, we had to support different entity types - for example, Delivery Job and Reminder. With these extensions, we had to update the codebase (i.e. Parser, Model and Logic) to support a much larger set of commands, as we were working with numerous commands from different windows (Timetable, Reminder, Statistics,…).
For Delivery Job Management System, as the job details were very long and could not be viewed inside a small cell in the job list, we wanted to add a feature for users to use mouse or arrow keys and click on the job to view its detail correspondingly. This was challenging as we need to learn how to make use of the UI and keyboard clicks.
We also added a GUI mode for our app - to speed up the speed of each command and thus, enhance users’ experience. Throughout this process, we learn how to use various JavaFX classes and interfaces.
We wanted to introduce a notification function to the app, so that users could be reminded of their jobs and upcoming tasks more easily. It was challenging to implement this function as JavaFx did not have any native notification feature. Hence, we had to find an external library that did so. We decided to used ControlFX, an open source project for JavaFX that serves to provide high quality UI controls on top of the existing JavaFX distribution. Through abstraction, this feature can be used by other portions of the applications (i.e. reminders, scheduling, etc). Hence, the implementation extended the functionalities and benefits of the application.
Also, we wanted users to be able to structure their plans for the week, thus we added a Timetable feature. However, as Timetable is directly linked with the delivery job list, the feature is closely related to the existing commands and functions. We also had to decide on the design/structure of the Timetable Window, and learn to use the TitledPane and ListView class in our timetable.
Overall, the Team Project for us was quite challenging, as it requires us to learn to work together and help each other. We had to divide the work among ourselves so that everyone can get a grasp of and understand the code base. Understanding and updating the code base was quite tough at first, due to high levels of abstraction and the amount of classes that AB3 has. We tried to break it down into small tasks and understand it little by little each week. These small improvements day-by-day helped us get used to the codebase and the workload eventually.
We also learnt to work as a team and contributed, reviewed and helped to debug each other’s work through weekly meetings and constant updates. Distributing the work and assigning small task to each member helped us gain more confidence throughout the project.